Operating on HF 101: Tuning your radio.
At some point in your ham journey you will get on HF and need to use an antenna tuner to tune your antenna to “match” with the radio. This keeps the radio happy and allow you to use one antenna on multiple bands.
For those of you who haven’t tuned a radio with a manual tuner, there are some steps that you have to follow.
- Turn down the drive level of the radio (most tuners want a lower drive level)
- Switch to AM and use the mic or switch to CW and use the key
- Make sure the “keyer” function is off on the radio, or deal with the bouncing “dit dit dit dit” needle movement as being sent by the keyer
- Transmit on the mic on with the key with one hand
- QUICKLY adjust the antenna tuner with the other hand
- Unkey
- Transmit again
- QUICKLY adjust the antenna tuner with one hand
- Unkey
- Repeat as necessary until you find the desired match
- ID yourself on the air
Now, this isn’t overly complicated, but does takes some thought and process of how to do it. Many of you are reading this, shaking your head and saying.. “AUTOMATIC TUNER JAY!!”
Yes. I know – an automatic tuner would make this a lot easier, however – in both of my last remote events (Field Day and Winter Field Day) I had an auto tuner not tune what I wanted it to do. Instead, the expensive single button box just decided to flash a LED light at me, mocking me in the middle of the night – flashing that damn light. blink blink blink blink.. or whatever the hell the darn combination was. Push again.. Blink blink blink.. etc. Aside from disconnecting the tuner and reconnecting all the connections, (which I didn’t want to get into) I just wanted it to work. However, with only ONE option to activate the tuner – pushing a single button.. and having already pushed it twice already.. (and realizing that insanity is doing the same thing over and over again expecting a different result) I would be lying if I did say I wanted to grab it with both hands and throw it off the side of the 7000′ cliff in the middle of the night. (Not that I didn’t actually consider this..or know right where I would have stood to launch this thing over the edge, or can actually hear in my mind what that tuner would have sounded like crashing through the trees below me after sailing off the edge of the rim..)
Regardless, when I am in ‘contest’ mode – long hours at the radio, and tired – I want the equipment to ‘just work’. So, when I am operating in remote conditions, I have a picked up a manual tuner for use with antennas that need to be tweaked with the tuner (I really prefer resonant antennas, but I will get into that in a different post). Actually, three of us that all operate together all got the same manual tuner – that way, everyone is familiar with the operations of each station, and can move to or teach someone else how to operate on one… and it will apply to all of them. We all went with the MFJ-949E, a 300W 2 port antenna tuner. I am sure I will end up blogging about why we chose that one.
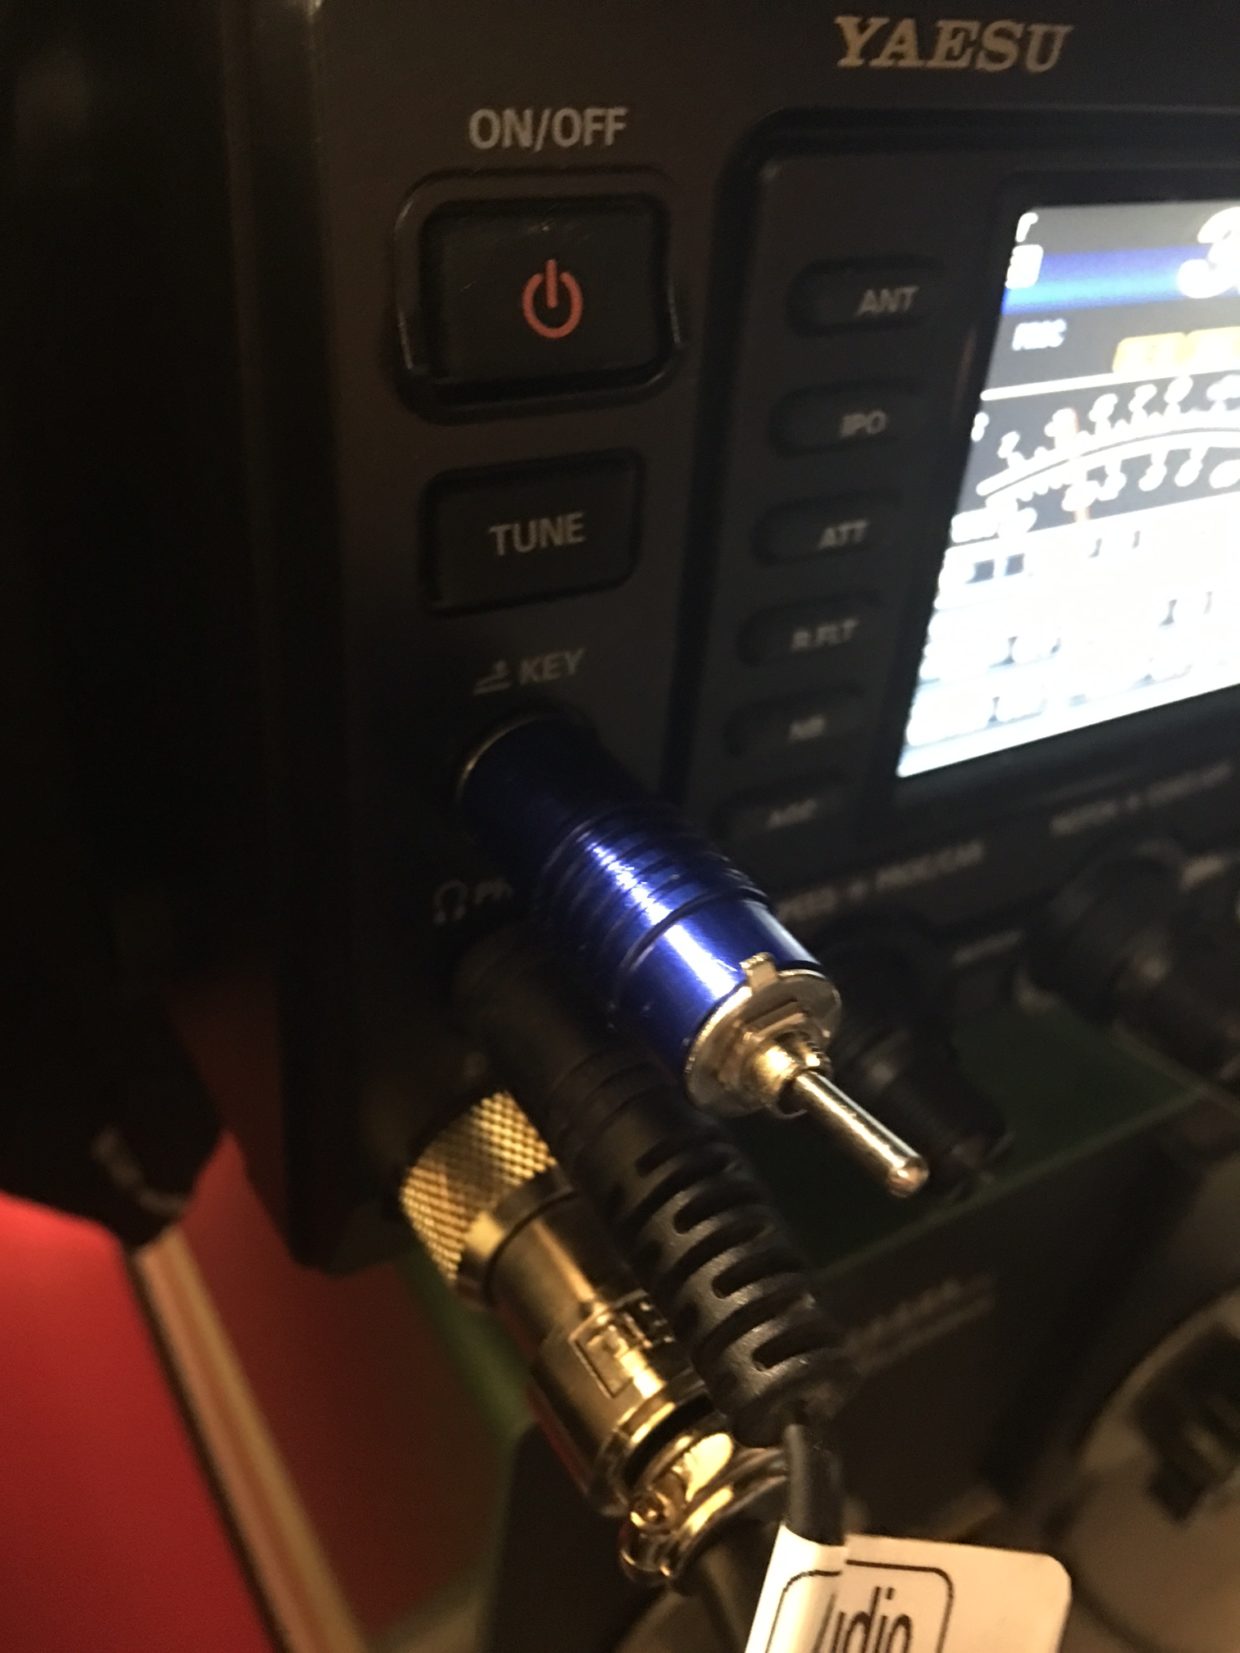
However, let’s bring this back to the reason for this post, this new addition to the shack. Cruising eBay contemplating purchases I discovered this.
VE9HF tune switch: A micro switch mated to the back of a 1/4″ plug.
Such a simple idea – but so useful at the same time. I ordered one, and a week later it was at my desert location.
When I got the switch from Rick, it was actually broken via the rough handling in the mail. (Emailing Rick, he provide a solution for the issue) A quick trip to the parts bin in the shack, I found a new stereo plug. Disassembled the current plug/switch, trimmed the length of the replacement plug to fit in the snazzy blue barrel – removed the solder connections from the old one, soldered the two contacts from the switch to the new 1/4″ plug (tip and ground) – and voila! The switch was operational again after about 5 minutes.
Now, this isn’t earth shattering technology.. However it makes EVERYTHING easier – and I am all about that. This new adapter lives in the front CW port and if and when I need to use the manual tuner – I switch to CW mode, check to make sure the drive level is down, then flip the switch – which sends out the constant carrier. USE both hands (Whoa! both hands at once) to adjust the tuner – then flip the switch back off.
Super easy – idiot proof and will even work when I am dead tired at 3 am in the middle of an event.

Flip the switch for a constant carrier on CW. Simple and easy.
Sometimes simple is the best. This is a perfect example.
See ya on the bands!
Matt Davis March 4, 2023
I can’t find one for sale, is a parts list and wiring diagram available?
Thank you
N1AV March 6, 2023 — Post Author
Humm… Matt, it is really nothing more than a 1/4 phone jack (maybe stereo or mono?) with a small micro SPST switch mounted in the end. Plug it in and flip the switch and it shorts the CW jack to key a signal. Very basic but worked great!