Due to a change in schedule for another one of my hobbies (OCR racing), I had a “free” day today. I took it upon myself to get to several projects that had been needing my attention as well a few new ones that I wanted to get completed.
So, with a morning cup of coffee in the dawn hours, I set out to the garage and start on the project. The first thing I wanted to do was get my linked dipole completed. I had purchased the linked dipole kit from SotaBeams out of the UK, as well as some of their lightweight wire to build the antenna. I wanted to make sure that I could see this when I was up on the peaks, so I went with the high visibility “yellow”. Great price for 100m of wire. Having now worked with it, it is plenty tough enough to handle my SOTA operations of 100W or less, (usually 20W) up on the peaks.
Since we are heading down on the solar cycle, I didn’t want to bother with 10 or 12m. I am rarely on 15 meters. 17 meters is my mainstay, with decent propagation stateside as well as DX, and a lot of HFPack folks are on that band. 20 meters was my second choice on the linked dipole, the workhorse of ham radio, and then for local contacts, I wanted 40 meters. Most folks do a 20-30-40 or a 10-15-20 combination for their linked dipole. I chose to be different.
The SOTAMAPS web site has a great inverted V linked dipole calculator. I quickly ran the numbers that I wanted and generated the plans.
If you are in the hunt for a 17-20-40 linked dipole as well, enjoy the linked PDF.
So, yes, SOTABEAMS does sell the whole antenna constructed, but again, not in the bands that I wanted. Plus, it was a fun project to play with. The attached PDF has all the measurements you need as well as adjustments for the center support height when run as an inverted V.
So Why a linked dipole?
Why not a G5RV or a 40m dipole hung in an inverted V shape and use a tuner?
Well, a few reasons.
1. Tuners waste power – and when running on QRP levels, I want the most power to the antenna.
2. Tuners can be heavy. Yes, some of the SOTA QRP CW tuners are very light, as in less than 2 oz. However, if you want the option run more than say 20W and voice, then you are talking at least a pound or two for the tuner. (And they still waste power).
3. A linked dipole is resonant on each band. 17m the highest SWR is a 1.3/1. 20m the antenna is centered on 14.170 (1.1/1) and crawls up to 1.6/1 at the CW and SSB band edges. 40 meters is centered at 7.180 and is a 1.7/1 at 7.300 and 1.6/1 at 7.070 MHz. All great measurements for an antenna that is 18′ off the ground at the apex suspended via a 20′ B’n’M Black Widow Crappie Rod and the ends of the 40m antenna are about 18″.
I will not be burning down the DX on 40m with this antenna, as it is much more a NVIS design. However, it will allow me to work the local chasers, which is what I wanted it for.
Several hours later of cutting, measuring, cutting measure, taking it all down, soldering clips on the antenna, bringing it back out, putting it back up, measuring and cutting… I have the antenna where I want it. Complete! 17-20-40 linked dipole. I even have the benefit of 6 meters, which is FLAT from 50.0 to 50.200, which is all I care about. SWEET! I might have to give the system a test Sunday.
Once that project was completed, I moved on the next.
Onan 4K RV generator
My Onan generator in RV has been acting up lately. Several reason for it.
- I haven’t been power cycling it as I should, so it was a mouse nest in the generator bay.
- I am sure I have a ton of varnish and clogged jets in the carb on then generator.
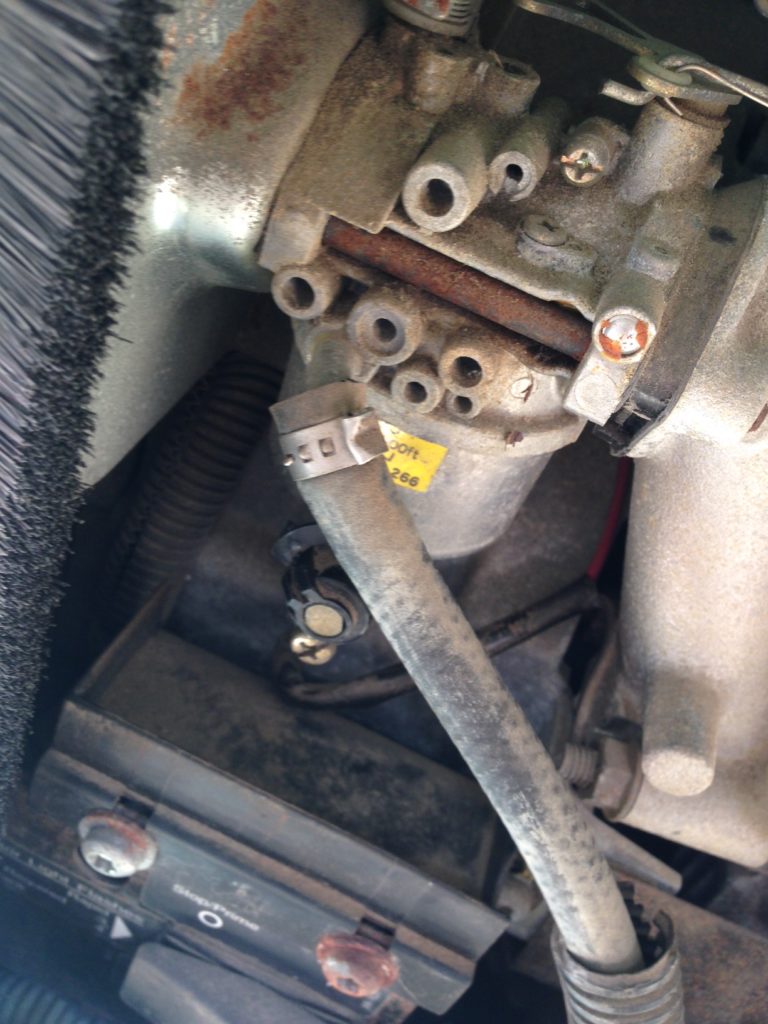
Fuel line for the Onan 4000 MicroQuiet generator
I have played with cleaning carbs before, but not on this generator. Everything I read says that Onan doesn’t both fixing or cleaning them, rather they just charge $300 for a new one. OUCH!! I am not spending that. Hell, that is almost 300W of solar! 🙂
So, a few months before Field Day I went about to clear out all the nests and crap around the generator and tried to fire it up a few times. It caught and ran but the idle was up and down and up and down the entire time. Flash forward to Field Day, I was really craving some popcorn at about 11:30 on Saturday night. 20 meters had died and 80 m wasn’t hopping with FD activity. I tried to fire up the generator for about 30 minutes and it never started, it would catch, burn through the priming fuel, then die. So, I knew I had a fuel / gunk issue.
Back to today, knowing full well that in order to really attack this carb I needed to drop the generator (all 400# of it) from under the motorhome, combined with the fact that the cage and bolts are all rusted quite badly from the time in Maine.. I decided I would try my best without taking it all out. The first thing I did was pull off the fuel line, fill it full of carb cleaner, then run the priming system. This pushed the carb cleaner into the carb and then I ran it. I did this several times. Two hours later of various running cycles, under different load conditions (and hey the AC in the RV still works!) The generator starts right up, and the surging is much less. It is still not perfect, more of a band aid, but in 104 degree heat, it was good enough for today (and probably this summer until the heat dies down).
Meters for the Power plant
The next project was installing the:
Bayite DC 6.5-100V 0-20A LCD Display Digital-Current-Voltage-Power-Energy-Meter-Ammeter Multimeter in to my “luggable” solar battery system.
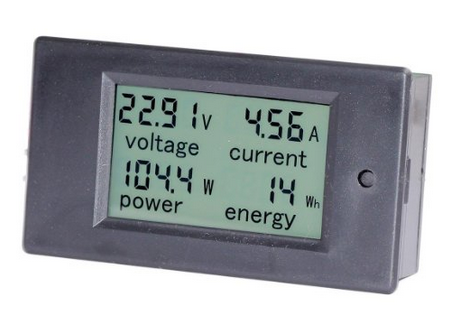
Bayite Voltage Ammeter Multimeter.
I mounted this into my “luggable” Solar / Powerpole power plant that I use when activating from the park or other location. It allows for solar charging as well as powerpoles (plus cig lighter socket and 2 USB ports) for the various needs of the technology. I will have to do a full post on it at a later date… Regardless, I added this meter to the solar INPUT side, so I can measure the solar voltage and amperage going TO the charge controller. Why do I want to know this? Well, this tells me if I have shading issues on the panels by watching the voltage level.
It is a pretty slick unit. I am sure I will add one to the motorhome (but the 100A version).
YO-YO HF ANTENNA
Once I got that project completed, I went off and tackled one that had been bothering me for a while, the Yo-Yo dipole antenna. If you look at this link and the nice picture, that is not what I got when I ordered mine a few years ago. Mine was terminated to a UHF connector , and poorly done at that. I wasn’t real happy with the construction at all.
So, fresh from making the linked dipole, I cut up some scrap plastic, grabbed a torroid for a choke balun and went at modifying this antenna.
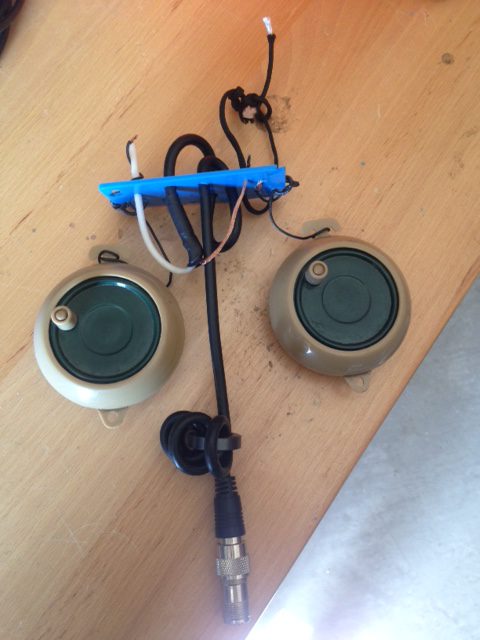
Ugly antenna always work better right?
It isn’t pretty by any stretch of the imagination.. however, it should work just fine. Until I come up with a marking system for black wire, I will have to use a tuner with this one. However, it should play from 6- 40 meters just fine one I get the lengths worked out as well.
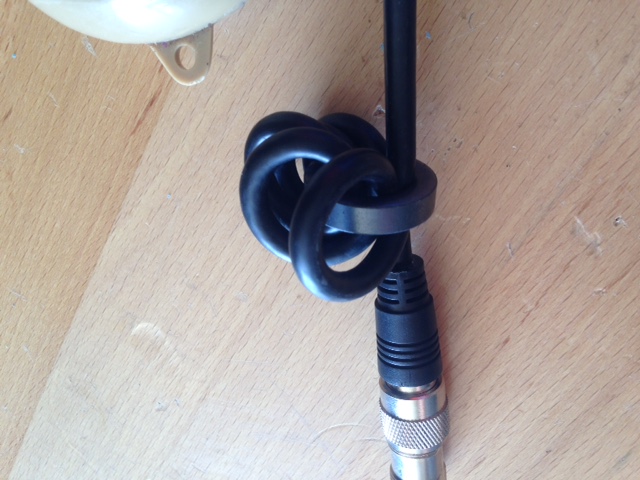
Close up of the choke balun
An hour or so of clean up as well as organization, and I was done. Enough time in the sun and my shirt was salt stained from the sweat. it was a 150 oz water day, and I am still thirsty!
However, two antenna completed, the generator in the RV is running again, the AC works, and I got the meter installed in the power plant.
All in all a great day off from work.